
Waterfalls can be challenging to photograph. Often they are shaded, or in tight places. Often they are in a position that is poorly lit or never illuminated. Sometimes it is hard to get a good vantage point, whether it be due to people, space, or water blocking the way! Exposure can be tricky – water is bright white (especially in full sun), and rocks are dark.
Here are a series of tips which might help you come away with better photos of beautiful waterfalls!
1. Equipment
Don’t get hung up on not having the latest and greatest camera gear. You don’t need it – the photographer takes the shot, not the camera.
The essential gear is a camera (duh) – preferably one that has manual settings. And the second piece of essential gear is a tripod.
That’s it. There are other things you can have to create different effects, but I’m a believer in learning to master what you’ve got first.
A polariser filter can be useful for controlling glare from the water.
A wide angle lens can be good for tight spaces, but not essential.
Some people recommend ND filters for slowing down the exposure. They can be fun to play with for different effects but your certainly don’t need them – you can easily create long enough exposures without them.
2. Time of day
The best time of day depends on the waterfall.
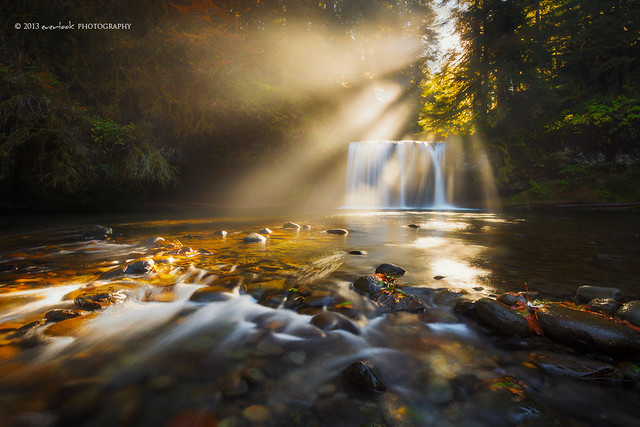
As I touched on in my previous waterfall post (which has specific examples of the best times of day to shoot our Darwin waterfalls http://wp.me/p3zwhm-4Z), time of day is important. The best light for landscape photos is sunrise and sunset. This also includes waterfalls! Light is generally softer at these times – the photo will be nicely lit and you will find it easier to expose for the water.

By Ryan Dyer – the post-sunset light provides an even light on the waterfall with a beautiful backdrop
Some waterfalls are in caves or caverns which are always in shade. In these cases, midday will be best – so that light is overhead the cavern and actually provides something to the otherwise dark space.

Garry Hart
In any case, which ever waterfall you choose, you will need to do your research.
I cannot make a statement like “sunset is the best time for waterfall photography” because it’s just not true. Every location is different – you need to research what the best time of day is for your chosen location.
What you are looking for when choosing the best time of day is either:
Even light – preferably when the entire area is in shade.
OR if the sun does reach the location, either sunrise or sunset: to have the sun shining ON TO your waterfall.
I.e. the sun should be behind you if you are pointing your camera at the falls.
Here are a couple of links to my previous blogs which you might find useful:
- Photographing waterfalls in the Darwin region – http://wp.me/p3zwhm-4Z
- The importance of planning in Photography – http://wp.me/p3zwhm-4S
3. Composition tips
As ever in creating a great photo, you need to get your composition right. Composition vantage points can sometimes be limited with waterfalls. For instance, you can’t usually swim with your camera and sometimes vantage points are limited to a small platform.
Composition ideas vary between people – my biggest tip is to always try and create something different. Find an interesting foreground, a different vantage point, try going out at different times of day or in the rain! This can take time – spend the time getting to know the location if you can.
- Be imaginative…. I rarely step up to a scene and begin shooting immediately. I like to walk around, check the place out, observe the common viewpoints… and then try to get away from them! That could mean a movement as simple as shooting low, or it could mean wading through a creek with the camera gear, to get to a different spot.
- Don’t be afraid to explore (within reason of course, I don’t mean jump the fence).
- Don’t be afraid to get your feet wet! Or, wear wellies!
- Try different angles, see what they look like through the viewfinder. If you are less experienced, and you are using digital, it doesn’t matter if you take 300 photos in an hour…. Try different things. See how different angles work.
- Of course most of the time it pays to be considered, always think about where you place different elements within the viewfinder.
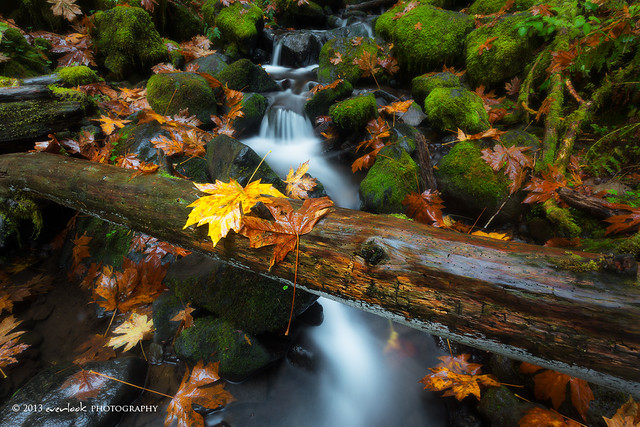
- Don’t forget foreground. Even though waterfalls are awesome all by themselves, photographs generally need a foreground to lead you in to the scene.

Here the green, textured rocks provide the foreground
- Where is the water heading? If you are at a location that has a stream/creek or river in the scene as well as a waterfall, compose carefully with the lines. It is often better to use the lines and flow of the creek to flow through the frame instead of directly out. Like when photographing people (don’t chop off their heads or wrists), don’t cut the water flow off too short either.

Keep the waterfall heading in to the scene
- Consider using people to give a sense of scale – sometimes it is hard to visualise the size of a place without being there. Consider including a person or a building or something, for the viewer to compare with the size of the falls.

A teeny tiny person and a footbridge help us understand how tall these falls are!
- Get close to details. Try zooming in on particular elements of the waterfall. Whether it be water moving around the rocks, interesting colours, leaves, trees….. Try to show the details as well as the grand scale.

5. Shutter Speed
In all of the examples I have posted above, all of them use longer shutter speeds.
Why? I can’t speak for everyone, but for me the longer exposures have a few benefits:
- Softer look to the photo – smoothness of the water
- Interesting patterns and shapes as the water moves around the stationary objects
- Creates a surreal look that the naked eye cannot visualise – a long exposure with water shows the scene in a different way to everyday vision! It can be considered more artistic!
How long does the exposure need to be?
That depends on the waterfall. If your waterfall is very slow flowing and just trickling, you might find you need to use an even longer exposure.
If your waterfall is a raging torrent you might find the exposure time doesn’t really need to be that long – shorter exposure times can sometimes show the power and speed of the waterfall better than a longer exposure. Long exposures blend everything together and if too long, the viewer might lose concept of how big and strong this waterfall really is.

This waterfall is shot using a much quicker shutter speed – you can still see the fast flow of the water: 1/80th of a second.
The process of determining the best shutter speed will be trial and error. I will usually start on the “best” settings for my camera and see what results that gives.
So, I will start by using ISO 100, with Aperture Priority mode set to f10.
I check the results on screen. If I think the shutter speed is too quick, I might stop down to f13 or f16. If I still don’t think the shutter speed is slow enough, then it’s time to start adding filters. Similarly, if I think the first shot is too slow, I might try f8 as an aperture, coupled with ISO 200.
Problems with using long exposure?
Sometimes if it’s windy there can be movement evident over a long exposure. For example, the wind blowing the trees means they will be blurry in your photo. To combat this, some photographers will take a second photo with a quicker exposure time – then you can layer the non-blurred photo in to the photo with the slow water motion. I can do another blog post on how to do this – if anyone is interested, leave me a comment.
Similarly, you will need to make sure that your tripod is 100% steady – make sure you are on stable rocks, and not standing the tripod in water moving too fast! Don’t let the wind or water wobble the tripod as your photo will be blurred.
6. Other tricks – if you can’t be there at the “best time of day”.
- A polarising filter can be helpful to eliminate glare from the water, and assist with giving the greens/blues a boost
- ND filters can help with getting long exposures in those brighter times!
- Graduated ND filters can help with darkening the bright skies at the top of the waterfall.
- Try bracketing:
This means take one at the “correct” exposure for the entire image. Take one or two over exposed (to bring out details in the shadows) and take one or two as underexposed (to bring out details in the highlights).
You can merge these shots together in post processing to give one final image with the correct exposure. The camera can struggle with capturing scenes with a high dynamic range (i.e. dark shadows and bright highlights). The technique of bracketing photos and merging them together is known as HDR photography (High Dynamic Range). Again, I can do a tutorial on this technique – if you are interested, let me know by leaving a comment.
I recently was faced with a scenario as I described above, and took a series of three photos to combine together. This was the resulting image:

Manton Dam overflows after Darwin’s monsoonal weather. This was three exposures combined to create an evenly exposed photo.
And finally….
A little bit of watery inspiration from Flickr. As always, if you click on the photos below you will be taken to the artists’ photo stream where you can view more of their work.


I love water – I hope you enjoyed looking at these photos as much as I did. A little bit of inspirational, I hope!